Prepare for Installation
Applies to all Sleep Number smart bed models. Does not include Sleep Number 360® smart beds. For the Sleep Number c1 smart bed, follow Sleep Number 360 Air Systems Installation Guide.
Click or tap the bed with the part you are installing and scroll down to show the next steps.
Air Chamber Install for beds with non-adjustable base
What you will need
-
White air chamber caps (typically stored in your smart mattress, base, or provided during delivery). If you do not have white air chamber caps, you can order them online or visit a Sleep Number store near you.
-
Replacement air chamber(s)
-
Sleep Number® app or remote.
-
Four towels to place over the MicroHook™ strips (integrated base only).
-
Two people are required to complete installation.
How to install your air chamber(s)
-
Inflate your smart bed to 100 on both sides using your Sleep Number app or remote.
-
Remove all bedding and unplug your bed from the wall outlet or power strip.
-
At the hip of your bed, near the center, disconnect the hose(s) from the air chamber(s) in your bed by pressing down on the tab while pulling the connector. You may hear air releasing from the air chamber(s). Cap the air chamber(s) using the white air chamber caps. Single chamber beds only have one hose connection.
-
Dual chamber bed sizes: Double, Queen (dual chamber), King, California King, Split King, Split California King, FlexTop™ King, FlexTop California King
-
Single chamber bed sizes: Twin, Twin XL, Full, Queen (single chamber)
-
Disconnect the temperature sensor strip wire by pressing the latch and pulling at the head of the wire (only on some models).
-
-
If you have an integrated base: Lift and move your smart mattress off your base. Place towels over the white MicroHook strips near the head and center of your base.
-
This will prevent damaging your smart mattress on the MicroHook strips when flipping upside down.
-
-
Flip the smart mattress upside down so the bottom of your smart mattress is facing up.
-
Unzip the cover and fold back the unzipped portion of the cover.
-
Tuck temperature strip wires into the side of cover wall (only on some models).
-
-
While holding the French door foam base pads open (only on some models), remove the air chamber(s).
-
Plug your bed back into its wall outlet or power strip.
-
Prepare your new air chamber(s) for installation by attaching hoses to the chamber(s) while outside of your bed. Use only the slack of the hose that is provided. Do not pull on the hose.
-
If your air chambers have two zippers, unzip either side of the chambers when inflating to 100. After inflating and capping, re-zip.
-
Inflate your chamber to 100. You will hear and see air entering the chamber(s). It may take a little while to inflate when the chamber(s) are completely flat, and your Sleep Number® setting may not change right away.
-
Once inflated, disconnect hoses and cap off air chamber(s) with white air chamber caps.
-
-
Place new chamber(s) into your smart mattress. Make sure the chamber nozzle is facing up.
-
Close the French door foam base pads (if applicable).
-
Straighten cover bottom out and route wires through openings in the cover.
-
Gently zip the cover closed. Pull the cover tight while zipping to straighten the cover out.
-
Flip the smart mattress right side up.
-
Remove towels from the base (if applicable).
-
Reconnect smart mattress to base.
-
Feed hose and wires (if applicable) through base opening at hip.
-
Remove white air chamber cap(s) and connect hoses to chamber(s). Push until you hear or feel them click into place.
-
If you have temperature sensor strips: Unplug your bed, then reconnect temperature sensor strips. Plug your bed back into its wall outlet or power strip.
-
-
If you have the Sleep Number app: Open the app, login (if needed) and complete the following steps in Sleep Number app (If you do not have the Sleep Number app, follow these instructions for downloading the app to your device.)
-
Note: If you just have a remote, skip the below steps and adjust your Sleep Number setting on each side of your bed.
-
Tap “Smart Bed.”
-
Tap the “Bed Settings” icon in the upper right corner of your screen.
-
Tap “Quick System Test” to complete installation.
-
-
Adjust your Sleep Number setting on each side of your bed.
Pump Install for beds with non-adjustable base
What you will need
- White air chamber caps (typically stored in your smart mattress, base, or provided during delivery). If you do not have white air chamber caps, you can order them online or visit a Sleep Number store near you.
- Replacement Smart Control System
- Sleep Number® app – Required.
- Two people are required to complete installation.
How to install your Smart Control System
- Remove all bedding and unplug your bed from the wall outlet or power strip.
- Locate the Smart Control System.
-
If you have an integrated base: Smart Control System is either located at foot of your bed at the sleeper left side or on the floor underneath the bed. Follow these steps for how to access your Smart Control System.
- At the hip of your bed, near the center, disconnect the hose(s) from the air chamber(s) in your bed by pressing down on the tab while pulling the connector. You may hear air releasing from the air chamber(s). Cap the air chamber(s) using the white air chamber caps. Single chamber beds only have one hose connection.
- Dual chamber bed sizes: Double, Queen (dual chamber), King, California King, Split King, Split California King, FlexTop™ King, FlexTop California King
- Single chamber bed sizes: Twin, Twin XL, Full, Queen (single chamber)
- Disconnect the temperature sensor strip wire by pressing the latch and pulling at the head of the wire (only on some models).
- While at the foot of your bed, lift and move your smart mattress to the left so it slightly hangs off the edge of your base. Lift the compartment lid to access the Smart Control System.
- IMPORTANT: If your Integrated Base has white Microhook™ attachment strips running horizontally across the base, do not slide the smart mattress on the strips. This can damage the cover.
- At the hip of your bed, near the center, disconnect the hose(s) from the air chamber(s) in your bed by pressing down on the tab while pulling the connector. You may hear air releasing from the air chamber(s). Cap the air chamber(s) using the white air chamber caps. Single chamber beds only have one hose connection.
- If you do not have a base: The Smart Control System is typically placed at the head of your bed on the floor.
-
If you have an integrated base: Smart Control System is either located at foot of your bed at the sleeper left side or on the floor underneath the bed. Follow these steps for how to access your Smart Control System.
- Disconnect Smart Control System.
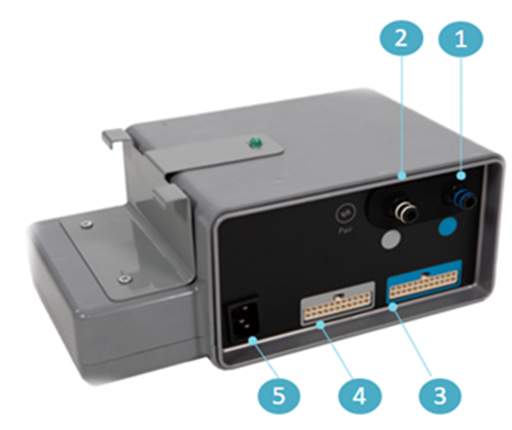
- Sleep Right Hose (Blue Connector) – Press down on tab while gently pulling the connector. You may hear air releasing from the hose.
- Sleeper Left Hose (White Connector) – Press down on tab while gently pulling the connector. You may hear air releasing from the hose.
- Left Sensor Harness (Black Plug) – Press tab down while gently pulling at the head of the connector.
- Right Sensor Harness (White Plug) – Press tab down while gently pulling at the head of the connector.
- Power Cord – Pull at head of connector and pull out.

- Remove your Smart Control System.
- Before connecting the new Smart Control System, write down its MAC address.
- The MAC address is on the bottom of the Smart Control System. You'll need it to finish the installation process within the Sleep Number app.
- Reconnect Smart Control System.
- Sleep Right Hose (Blue Connector) – Gently push until you hear or feel connector click into place.
- Sleeper Left Hose (White Connector) – Gently push until you hear or feel connector click into place.
- Left Sensor Harness (Black Plug) – With tab on top, gently push wire connector into port.
- Right Sensor Harness (White Plug) – With tab on top, gently push wire connector into port.
- Power Cord – Plug cord into system.
- Put your new Smart Control System where the original Smart Control System was placed and return compartment lid.
- Lift and move your smart mattress back into place.
-
If you have an integrated base: Reattach smart mattress.
- Feed hose and wires (if applicable) through base opening at hip.
- Remove white air chamber cap(s) and connect hoses to chamber(s). Push until you hear or feel them click into place.
- Reconnect the temperature sensor strip (if applicable).
- Plug your bed back into its wall outlet or power strip.
- Login and complete the following steps in the Sleep Number app (If you do not have the Sleep Number app, follow these instructions for downloading the app to your device.)
- Tap “Smart Bed.”
- Tap the “Bed Settings” icon in the upper right corner of your screen.
- Tap “Install Replacement Electronics” and follow the steps on your screen.
- Adjust your Sleep Number setting on both sides of your bed.
Air Chamber Install for beds with FlexFit™ smart adjustable base
What you will need
- White air chamber caps (typically stored in your smart mattress, base, or provided during delivery). If you do not have white air chamber caps, you can order them online or visit a Sleep Number store near you.
- Replacement air chamber(s)
- Sleep Number® app or remote.
- Two people are required to complete installation.
How to install your air chamber(s)
- Inflate your chamber(s) to 100 using your Sleep Number app or remote. Ensure your smart bed is in the flat position and remove all bedding.
- Disconnect smart mattress from base.
- If you have a FlexTop™ or Split King: Using your app or remote, raise the head of your bed. Unsnap the black straps connecting the smart mattress to the base. Return your bed to the flat position.
- Lift and unsnap the grey straps located at the foot (2) and then at the hip (1 per side) of your bed. Split King models have four (4) foot straps.
- Unplug its power cord from the wall outlet or power strip.
- At the hip of your bed, near the center, disconnect the hose(s) from the air chamber(s) in your bed by pressing down on the tab while pulling the connector. You may hear air releasing from the air chamber(s). Cap the air chamber(s) using the white air chamber caps. Single chamber beds only have one hose connection.
- Dual chamber bed sizes: Double, Queen (dual chamber), King, California King, Split King, Split California King, FlexTop King, FlexTop California King
- Single chamber bed sizes: Twin, Twin XL, Full, Queen (single chamber)
- If you have a FlexFit™ 3 smart base with foot warming: Disconnect foot warming connections at the hip of the bed by pressing down on the latch at the head of the connector and gently pulling.
- Disconnect the temperature sensor strip wire by pressing the latch and pulling at the head of the wire (only on some models).
- Flip the smart mattress upside down so the bottom of your smart mattress is facing up. Use the sides of the smart mattress to flip. Do not use the straps to prevent damaging the cover.
- Unzip the cover and fold back the unzipped portion of the cover.
- Tuck temperature strip wires into the side of cover wall (only on some models).
- While holding the French door foam base pads (only on some models) open, remove the air chamber(s).
- Plug your bed back into its wall outlet or power strip.
- Prepare your new air chamber(s) for installation by attaching hoses to the chamber(s) while outside of your bed. Use only the slack of the hose that is provided. Do not pull on the hose.
- If your air chambers have two zippers, unzip either side of the chambers when inflating to 100. After inflating and capping, re-zip.
- Inflate your chamber to 100. You will hear and see air entering the chamber(s). It may take a little while to inflate when the chamber(s) are completely flat, and your Sleep Number® setting may not change right away.
- Once inflated, disconnect hoses and cap off air chamber(s) with white air chamber caps.
- If you have a FlexTop King or Split King, unzip your air chambers.
- If you have a FlexTop King: Unzip the air chambers halfway.
- If you have a Split King: Completely unzip the air chambers.
- Place new chamber(s) into your smart mattress. Make sure the chamber nozzle is facing up.
- Close the French door foam base pads (if applicable).
- Straighten cover bottom out and route wires through openings in the cover.
- Gently zip the cover closed. Pull the cover tight while zipping to straighten the cover out.
- Flip the smart mattress right side up.
- Reconnect smart mattress to base.
- Feed hose and wires (if applicable) through base opening at hip.
- Remove white air chamber cap(s) and connect hoses to chamber(s). Push until you hear or feel them click into place.
- If you have foot warming AND/OR have temperature sensor strips: Unplug your bed, then reconnect foot warming and or temperature sensor strips. Plug your bed back into its wall outlet or power strip.
- Reconnect grey straps: First, reconnect the straps at the hip (1 per side) and then at the foot (2) of your bed. Split King models have four (4) foot straps.
- If you have a FlexTop or Split King: Using your app or remote, raise the head of your bed. Snap the black straps to connect the smart mattress to the base. Return your bed to the flat position.
-
If you have the Sleep Number app: Open the app, login (if needed) and complete the following steps in Sleep Number app (If you do not have the Sleep Number app, follow these instructions for downloading the app to your device.)
- Note: If you are using a remote, skip the below steps and adjust your Sleep Number setting on each side of your bed.
- Tap “Smart Bed.”
- Tap the “Bed Settings” icon in the upper right corner of your screen.
- Tap “Quick System Test” to complete installation.
- Adjust your Sleep Number setting on each side of your bed.
Pump Install for beds with FlexFit™ smart adjustable base
What you will need
- White air chamber caps (typically stored in your smart mattress, base, or provided during delivery). If you do not have white air chamber caps, you can order them online or visit a Sleep Number store near you.
- Replacement Smart control system
- Sleep Number® app – Required.
- Two people are required to complete installation.
How to Install your Smart Control System
- Start with your bed in a flat position. Remove all bedding and unplug the power cord from its wall outlet or power strip.
- Locate the Smart Control System found on the sleeper’s side at the foot of the bed, attached to the bed frame.
-
Note: If you have furniture or cannot access your Smart Control System from underneath your bed, follow the additional steps below to access your Smart Control System.
- Remove smart mattress from base.
- Your bed will need to be plugged in to start this process.
- If you have a FlexTop® King or Split King: Using your app or remote, raise the head of your bed. Unsnap the black straps connecting the smart mattress to the base. Return your bed to the flat position.
- Lift and unsnap the grey straps located at the foot (2) and then at the hip (1 per side) of your bed. Split King models have (4) foot straps.
- Inflate your chamber to 100. You will hear and see air entering the chamber(s). It may take a little while to inflate when the chamber(s) are completely flat, and your Sleep Number® setting may not change right away.
- Unplug the power cord from its wall outlet or power strip.
- At the hip of your bed, near the center, disconnect the hose(s) from the air chamber(s) in your bed by pressing down on the tab while pulling the connector and cap off air chamber(s) with white air chamber caps. You may hear air releasing from the air chamber(s).
- If you have a FlexFit™ 3 smart base with foot warming: Disconnect foot warming connections at the hip of the bed by pressing down on the latch at the head of the connector and gently pulling.
- Disconnect the temperature sensor strip wire by pressing the latch and pulling at the head of the wire (only on some models).
- Tuck any wires from the smart mattress side into the smart mattress.
- Remove smart mattress from base. Use the sides of the smart mattress to lift. Do not use the straps to prevent damaging the cover.
- From sides of the base near the foot, grab where the grey straps attached to the foot of the base. Lift and pull toward the head of the base. The panels will bend up and stay in position until you let them down.
- If you have a FlexFit 1: Lift foot of the platform straight up to a 90-degree bend.
- If you have a FlexFit 2 or 3: Lift the decking panels up and slide toward the head of the base. They will bend up and stay in that position until you let them down.
- Remove smart mattress from base.
-
Note: If you have furniture or cannot access your Smart Control System from underneath your bed, follow the additional steps below to access your Smart Control System.
- Disconnect Smart Control System.
- Sleep Right Hose (Blue Connector) – Press down on tab while gently pulling the connector. You may hear air releasing from the hose.
- Sleeper Left Hose (White Connector) – Press down on tab while gently pulling the connector. You may hear air releasing from the hose.
- Left FlexFit Smart Base (Black Plug) – Press tab down while gently pulling at the head of the connector.
- Right FlexFit Smart Base (White Plug) – Press tab down while gently pulling at the head of the connector.
- Power Cord – Pull at head of connector and pull out.
- Remove your Smart Control System.
- Tilt Smart Control System from rear and lift off frame.
- Before connecting the new Smart Control System, write down its MAC address.
- The MAC address is on the bottom of the Smart Control System. You'll need it to finish the installation process within the Sleep Number app.
- Put your new Smart Control System where the original Smart Control System was placed.
- Place hooks in slots on frame.
- Reconnect Smart Control System.
- Sleep Right Hose (Blue Connector) – Gently push until you hear or feel connector click into place.
- Sleeper Left Hose (White Connector) – Gently push until you hear or feel connector click into place.
- Left FlexFit Smart Base (Black Plug) – With tab on top, gently push wire connector into port.
- Right FlexFit Smart Base (White Plug) – With tab on top, gently push wire connector into port.
- Power Cord – Plug cord into system.
-
Note: If you have furniture or could not access your Smart control system, follow the additional steps below to reattach your smart mattress.
- Flip smart mattress back on and reconnect it to the smart base.
- Remove white air chamber cap(s) and connect hoses to air chamber(s). Push until you hear or feel them click into place.
- Reconnect temperature sensor strip wire and foot warming connections (if applicable).
- Reconnect grey straps: First, reconnect the straps at the hip (1 per side) and then at the foot (2) of your bed. Split King models have (4) foot straps.
- If you have a FlexTop King or Split King: Plug your bed back into its wall outlet or power strip. Using your app or remote, raise the head of your bed. Snap the black straps to connect the smart mattress to the base. Return your bed to the flat position.
- Flip smart mattress back on and reconnect it to the smart base.
-
Note: If you have furniture or could not access your Smart control system, follow the additional steps below to reattach your smart mattress.
- If you haven't already, plug in your smart bed.
- Login and complete the following steps in the Sleep Number app. (If you do not have the Sleep Number app, follow these instructions for downloading the app to your device.)
- Tap “Smart Bed.”
- Tap the “Bed Settings” icon in the upper right corner of your screen.
- Tap “Install Replacement Electronics” and follow the steps on your screen.
- Adjust your Sleep Number setting on both sides of your bed.